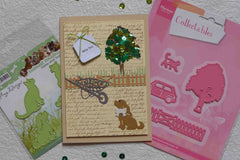
We can't stop playing with this month's card kit! So many choices.

Now we're onto the cupcakes.

We hate waste!  So we just couldn't resist doing something with those inner pieces from the Mini cupcake die cutout - they look just like a cake on their own.  If you are careful when removing the die from your cutting machine, the pieces all stay in the die.
We used a scrap cutout of the main cupcake as a mask and adhered it to our card with temporary adhesive. 
We then used our Zig Glue Pen to dot glue on the back of each inner pieces and inlayed them through the mask before removing it to leave the perfect 'cupcake' you see on the second card!  Just love that new Matt Bronze Foil Card.

Inlay Technique

Using the same method but not removing the mask - we also cut the cupcake out in 2 colours and inlayed the purple inner pieces into the white cupcake for this card!  Our simple background was made using the mini cupcake stamp just stamped all over the card with Memento ink in a colour almost the same as the card. The Memento Dew Drop sets are great value.
  

Our biggest kit ever!
With so many images of friendship and fun, this month's kit has endless uses.
A wonderful matching collection from Couture Creations that reflects friendships in its many forms. 

These cards evoke a sense of time gone by with their vintage feel thanks to the lovely papers in the 6x6 Blooming Friendships paper pad this month.  Plus lots of lovely sentiments and labels to use. 
With dies and stamps galore you can't help but make loads of a wonderful cards!
Great for family events too - get ready early with Mother's Day cards.


Shaker Cards

  • Base card A5 - 14.8cm x 21cm
  • Contrasting or matching card 13.8cm x 9.5cm
  • Acetate
  • Couture Creations double sided Self Adhesive Foam Strips
  • Frame or window die of your choice – square, heart, cloud etc
  • Or nesting dies to create a frame.
  • Decorations to shake – sequins, beads, gems etc

 Basic Quick Card

  1. Using the matching or contrasting card, cut a window using nesting dies or a frame die.
  2. Cut the acetate using the largest nesting die or the frame die.
  3. Adhere to the back of the window.
  4. Place foam strip around the window on top of the acetate – close enough to the window so the pieces will be seen through the window, but not close enough to be seen through the window.
  5. Mark on the base card where the window is.
  6. Decorate inside the window - the middle of the card
  7. If a large window adhere some of the pieces to the card around the decorations, so they are still on the background when the rest fall to the bottom when standing up.
  8. If a large card place shaker decorations into the middle of the card. Not too many so they won’t shake, but enough to be noticed when standing up.
  9. Adhere the frame to the card around the decoration.

Double Layer

Contrasting or matching card 13.8cm x 9.5cm

Acetate – 2 pieces slightly larger than the window

  1. Emboss your contrasting or matching card before you cut the window.
  2. Plan where the hole needs to be cut for the window.
  3. Die cut the window.
  4. Adhere double sided tape to acetate and adhere to back of window.
  5. Place foam strip around the window on top of the acetate – close enough to the window so the pieces will be seen through the window, but not close enough to be seen through the window.
  6. Place shaker decorations into the inner section of the foam on the acetate. Not too many so they won’t shake, not too few so they all fall to the bottom.
  7. Attach 2nd piece of acetate to the foam.
  8. Attach foam strip around the remainder of the card and double sided adhesive to the sides of acetate.
  9. Adhere the card to the base card.
  10. Decorate as required.

 Some Decorating Ideas:


Just added to your wishlist:
My Wishlist
You've just added this product to the cart:
Go to cart page